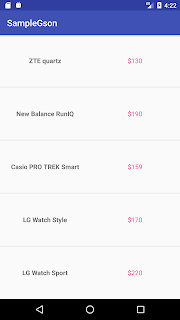
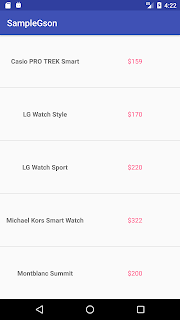
 Download Source Code via Github

 Download Source Code via Github
dependencies {
   compile 'com.jakewharton:butterknife:7.0.1'
}
package com.example.uge.butterknifesample;

import android.support.v7.app.AppCompatActivity;
import android.os.Bundle;;
import android.view.inputmethod.InputMethodManager;
import android.widget.EditText;
import android.widget.TextView;
import android.widget.Toast;
import butterknife.Bind;
import butterknife.ButterKnife;
import butterknife.OnClick;

public class MainActivity extends AppCompatActivity {

    @Bind(R.id.firstNum)
    EditText firstNum;

    @Bind(R.id.secondNum)
    EditText secondNum;


    @Bind(R.id.answerText)
    TextView answerTxt;

    @Override
    protected void onCreate(Bundle savedInstanceState) {
        super.onCreate(savedInstanceState);
        setContentView(R.layout.activity_main);
        ButterKnife.bind(this);

    }

    @OnClick(R.id.sumBtn)
    void getTheSumOfTwoNumbers(){
        if(validateEditText()){
            int fValue = Integer.parseInt(firstNum.getText().toString());
            int sValue = Integer.parseInt(secondNum.getText().toString());
            int sumValue = fValue + sValue;
            answerTxt.setText("Sum: " + sumValue);
        }else{
            Toast.makeText(this, "Please Input the Values in the EditText(s)", Toast.LENGTH_SHORT).show();
        }
        hideKeyboard();
    }

    @OnClick(R.id.diffBtn)
    void getTheDiffOfTwoNumbers(){
        if(validateEditText()){
            int fValue = Integer.parseInt(firstNum.getText().toString());
            int sValue = Integer.parseInt(secondNum.getText().toString());
            int diffValue = fValue - sValue;
            answerTxt.setText("Diff: " + diffValue);
        }else{
            Toast.makeText(this, "Please Input the Values in the EditText(s)", Toast.LENGTH_SHORT).show();
        }
        hideKeyboard();
    }

    public Boolean validateEditText(){
        //The Two EditText must have a value
        if(firstNum.getText().toString().length() > 0 && secondNum.getText().toString().length() > 0){
            return true;
        }else{
            return false;
        }
    }

    public void hideKeyboard(){
        InputMethodManager imm = (InputMethodManager) getSystemService(INPUT_METHOD_SERVICE);
        if(imm.isAcceptingText()) { // verify if the soft keyboard is open
            imm.hideSoftInputFromWindow(getCurrentFocus().getWindowToken(), 0);
        }
    }

}
<?xml version="1.0" encoding="utf-8"?>
<RelativeLayout xmlns:android="http://schemas.android.com/apk/res/android"
    xmlns:tools="http://schemas.android.com/tools"
    android:layout_width="match_parent"
    android:layout_height="match_parent"
    android:layout_margin="15dp"
    tools:context="com.example.uge.butterknifesample.MainActivity">

    <EditText
        android:id="@+id/firstNum"
        android:layout_width="match_parent"
        android:layout_height="45dp"
        android:inputType="number"
        android:hint="First Number" />

    <EditText
        android:id="@+id/secondNum"
        android:layout_width="match_parent"
        android:layout_height="45dp"
        android:hint="Second Number"
        android:inputType="number"
        android:layout_below="@+id/firstNum" />

    <Button
        android:id="@+id/sumBtn"
        android:layout_width="match_parent"
        android:layout_height="45dp"
        android:text="Sum"
        android:layout_below="@+id/secondNum"
        android:layout_margin="5dp"/>
    <TextView
        android:id="@+id/orText"
        android:layout_below="@+id/sumBtn"
        android:gravity="center"
        android:layout_width="match_parent"
        android:layout_height="wrap_content"
        android:text="OR"
        android:layout_margin="5dp"/>
    <Button
        android:id="@+id/diffBtn"
        android:layout_width="match_parent"
        android:layout_height="45dp"
        android:text="Difference"
        android:layout_below="@+id/orText"
        android:layout_margin="5dp"/>


    <TextView
        android:id="@+id/answerText"
        android:textSize="20sp"
        android:layout_width="match_parent"
        android:layout_height="wrap_content"
        android:layout_alignParentBottom="true"/>

</RelativeLayout>
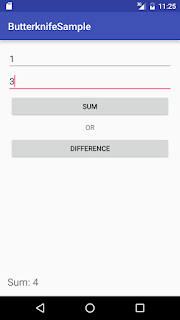
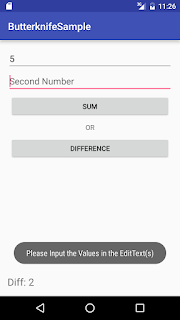
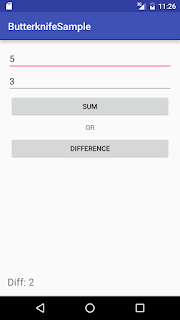
dependencies {
    compile fileTree(dir: 'libs', include: ['*.jar'])
    compile 'com.android.support:appcompat-v7:22.2.0'
}
<?xml version="1.0" encoding="utf-8"?>
<manifest xmlns:android="http://schemas.android.com/apk/res/android"
    package="com.sample.xeugene.imagedownload" >

    <uses-permission android:name="android.permission.INTERNET" />
    <uses-permission android:name="android.permission.ACCESS_NETWORK_STATE"/>

    <application
        android:name=".App"
        android:allowBackup="true"
        android:icon="@mipmap/ic_launcher"
        android:label="@string/app_name"
        android:theme="@style/AppTheme" >
        <activity
            android:name=".MainActivity"
            android:label="@string/app_name" >
            <intent-filter>
                <action android:name="android.intent.action.MAIN" />

                <category android:name="android.intent.category.LAUNCHER" />
            </intent-filter>
        </activity>
    </application>

</manifest>
package com.sample.xeugene.imagedownload;

import android.graphics.Bitmap;
import android.os.AsyncTask;
import android.support.v7.app.AppCompatActivity;
import android.os.Bundle;
import android.util.Log;
import com.nostra13.universalimageloader.core.ImageLoader;
import java.util.ArrayList;
import java.util.List;

public class MainActivity extends AppCompatActivity {

    final static String TAG = "MAIN_ACTIVITY";
    ImageLoader imageLoader;
    @Override
    protected void onCreate(Bundle savedInstanceState) {
        super.onCreate(savedInstanceState);
        setContentView(R.layout.activity_main);
        imageLoader = ImageLoader.getInstance();

        new DownloadThisImageFromUrl().execute();

    }
    //Running the method imageloader.loadImagesync() must be
    // run in the background thread of the App.
    public class DownloadThisImageFromUrl extends AsyncTask<String, String ,String> {
        @Override
        protected String doInBackground(String... strings) {
            for(String urls : listOfUrls()) {
                Bitmap image = imageLoader.loadImageSync(urls);
                Log.d(TAG, "Download Success: " + image);
                //You can use this var image to save in your SQLite DB :)
            }
            return null;
        }
        @Override
        protected void onPostExecute(String s) {
            super.onPostExecute(s);
            Log.d(TAG, "DOWNLOAD COMPLETE!");
        }
    }

    //Static list url of the Images
    //You can add your desired Images here :)
    public List<String> listOfUrls(){
        List<String> listUrl = new ArrayList<>();
        listUrl.add("http://dogzone.tcwebsites.netdna-cdn.com/wp-content/uploads/2015/01/Funny-dog-names.jpg");
        listUrl.add("http://dreamatico.com/data_images/dog/dog-5.jpg");
        listUrl.add("http://static.communitytable.parade.com/wp-content/uploads/2014/02/labrador-america-top-dog-breed-ftr.jpg");
        return  listUrl;
    }
}
package com.sample.xeugene.imagedownload;

import android.app.Application;
import android.content.Context;

import com.nostra13.universalimageloader.cache.memory.impl.WeakMemoryCache;
import com.nostra13.universalimageloader.core.DisplayImageOptions;
import com.nostra13.universalimageloader.core.ImageLoader;
import com.nostra13.universalimageloader.core.ImageLoaderConfiguration;
import com.nostra13.universalimageloader.core.assist.ImageScaleType;
import com.nostra13.universalimageloader.core.display.FadeInBitmapDisplayer;

/**
 * Created by EugeneAllen on 9/22/2015.
 */
public class App extends Application {


    @Override
    public void onCreate() {
        super.onCreate();

        initImageLoader(getApplicationContext());
    }

    public static void initImageLoader(Context context) {
        DisplayImageOptions defaultOptions = new DisplayImageOptions.Builder()
                .cacheOnDisc(true).cacheInMemory(true)
                .imageScaleType(ImageScaleType.EXACTLY)
                .displayer(new FadeInBitmapDisplayer(300)).build();

        ImageLoaderConfiguration config = new ImageLoaderConfiguration.Builder(
                context)
                .defaultDisplayImageOptions(defaultOptions)
                .memoryCache(new WeakMemoryCache())
                .discCacheSize(100 * 1024 * 1024).build();

        ImageLoader.getInstance().init(config);
    }
}
import android.app.Activity;
import android.content.SharedPreferences;
import android.support.v7.app.ActionBarActivity;
import android.os.Bundle;
import android.view.View;
import android.widget.Button;
import android.widget.Switch;
import android.widget.Toast;


public class MainActivity extends ActionBarActivity {

    Switch musicSwitch;
    Switch soundsSwitch;
    Switch updatesSwitch;

    Button saveBtn;
    @Override
    protected void onCreate(Bundle savedInstanceState) {
        super.onCreate(savedInstanceState);
        setContentView(R.layout.activity_main);

        musicSwitch = (Switch) findViewById (R.id.switch1);
        soundsSwitch = (Switch) findViewById (R.id.switch2);
        updatesSwitch = (Switch) findViewById (R.id.switch3);
        saveBtn = (Button) findViewById (R.id.buttonSave);

        setWidget();
        saveBtn.setOnClickListener(new View.OnClickListener() {
            @Override
            public void onClick(View view) {
                savePreferences();
            }
        });

    }

    private void setWidget(){
        //Get the value of SharedPref if null return false
        SharedPreferences customSharedPreference = getSharedPreferences("mySettings", Activity.MODE_PRIVATE);
        updatesSwitch.setChecked(customSharedPreference.getBoolean("updates",false));
        musicSwitch.setChecked(customSharedPreference.getBoolean("music",false));
        soundsSwitch.setChecked(customSharedPreference.getBoolean("sounds",false));


    }
    private void savePreferences(){

        SharedPreferences myPref = getSharedPreferences("mySettings", Activity.MODE_PRIVATE);
        SharedPreferences.Editor editor = myPref.edit();
        //Setting the value of SharedPref
        editor.putBoolean("music", musicSwitch.isChecked());
        editor.putBoolean("sounds", soundsSwitch.isChecked());
        editor.putBoolean("updates", updatesSwitch.isChecked());
        editor.commit();

        Toast.makeText(this, "Setting Saved", Toast.LENGTH_SHORT).show();
    }

}
<RelativeLayout
    android:layout_height="match_parent"
    android:layout_width="match_parent"
    android:orientation="vertical"
    tools:context=".MainActivity"
    xmlns:android="http://schemas.android.com/apk/res/android"
    xmlns:tools="http://schemas.android.com/tools">

    <Switch android:id="@+id/switch1"
        android:layout_centerInParent="true"
        android:layout_height="20dp"
        android:layout_width="wrap_content"
        android:text="Music"/>

    <Switch android:id="@+id/switch2"
        android:layout_height="20dp"
        android:layout_width="wrap_content"
        android:text="Sounds"
        android:layout_above="@+id/switch3"
        android:layout_alignLeft="@+id/switch3"
        android:layout_alignStart="@+id/switch3"
        android:layout_marginBottom="56dp" />


    <Switch android:id="@+id/switch3"
        android:layout_height="20dp"
        android:layout_width="wrap_content"
        android:text="Updates"
        android:layout_above="@+id/switch1"
        android:layout_alignLeft="@+id/switch1"
        android:layout_alignStart="@+id/switch1"
        android:layout_marginBottom="49dp" />

    <Button android:id="@+id/buttonSave"
        android:layout_height="45dp"
        android:layout_width="80dp"
        android:text="SAVE"
        android:layout_below="@+id/switch1"
        android:layout_centerHorizontal="true"
        android:layout_marginTop="58dp" />

</RelativeLayout>
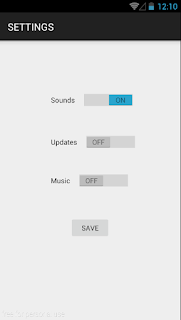

dependencies {
    compile fileTree(dir: 'libs', include: ['*.jar'])
    compile 'com.android.support:appcompat-v7:21.0.3'
    compile files('libs/ormlite-android-4.48.jar')
    compile files('libs/ormlite-core-4.48.jar')
}
package com.example.user.ormlite; import android.support.v7.app.ActionBarActivity; import android.os.Bundle; import android.view.View; import android.widget.Button; import android.widget.EditText; import android.widget.Toast; import com.j256.ormlite.android.apptools.OpenHelperManager; import com.j256.ormlite.dao.RuntimeExceptionDao; import java.util.List; public class MainActivity extends ActionBarActivity { DataHelper dbHelper; Button save; Button viewAll; Button delete; EditText student_name; EditText student_lastname; EditText student_age; @Override protected void onCreate(Bundle savedInstanceState) { super.onCreate(savedInstanceState); setContentView(R.layout.activity_main); //Get All Widget save = (Button) findViewById(R.id.btn_save); viewAll = (Button) findViewById(R.id.btn_view); delete = (Button) findViewById(R.id.btn_delete); student_name = (EditText) findViewById(R.id.name); student_lastname = (EditText) findViewById(R.id.surname); student_age = (EditText) findViewById(R.id.age); innit(); } public void innit(){ //OpenHelper of DatabaseHelper dbHelper = (DataHelper) OpenHelperManager.getHelper(this,DataHelper.class); final RuntimeExceptionDao<student integer=""> studDao = dbHelper.getStudRuntimeExceptionDao(); save.setOnClickListener(new View.OnClickListener() { @Override public void onClick(View view) { if(student_name.getText().toString().length() > 0 && student_lastname.getText().toString().length() > 0 && student_age.getText().toString().length() > 0) { studDao.create(new Student(student_name.getText().toString(), student_lastname.getText().toString(), Integer.parseInt(student_age.getText().toString()))); student_name.setText(""); student_lastname.setText(""); student_age.setText(""); Toast.makeText(MainActivity.this, "Student Saved", Toast.LENGTH_SHORT).show(); } else Toast.makeText(MainActivity.this, "Please Complete all Inputs", Toast.LENGTH_SHORT).show(); } }); viewAll.setOnClickListener(new View.OnClickListener() { @Override public void onClick(View view) { String display = ""; List<student> students = studDao.queryForAll(); for(Student holder : students){ display += holder.getFname() + " " + holder.getLname() + " " +holder.getAge() + "\n"; } Toast.makeText(MainActivity.this,"Students:" + display, Toast.LENGTH_SHORT).show(); } }); delete.setOnClickListener(new View.OnClickListener() { @Override public void onClick(View view) { List<student> students = studDao.queryForAll(); studDao.delete(students); Toast.makeText(MainActivity.this,"Deleted", Toast.LENGTH_SHORT).show(); } }); } public void onDestroy(){ super.onDestroy(); OpenHelperManager.releaseHelper(); } }
import com.j256.ormlite.field.DatabaseField;
import com.j256.ormlite.table.DatabaseTable;

/**
 * Created by Eugene Alvizo on 1/4/2015.
 */

public class Student {

    //Database Field for Table Student
    @DatabaseField (generatedId = true)
    private int id;
    @DatabaseField
    private String fname;
    @DatabaseField
    private String lname;
    @DatabaseField
    private int age;

    //Constructors

    public Student() {
      //Adding a No-Argument-Constructor
    }

    public Student(String fname, String lname, int age) {
        this.fname = fname;
        this.lname = lname;
        this.age = age;
    }

    public Student(int id, String fname, String lname, int age) {
        this.id = id;
        this.fname = fname;
        this.lname = lname;
        this.age = age;
    }

    //Getters and Setters
    public int getId() {
        return id;
    }

    public void setId(int id) {
        this.id = id;
    }


    public String getFname() {
        return fname;
    }

    public void setFname(String fname) {
        this.fname = fname;
    }

    public String getLname() {
        return lname;
    }

    public void setLname(String lname) {
        this.lname = lname;
    }

    public int getAge() {
        return age;
    }

    public void setAge(int age) {
        this.age = age;
    }

}
package com.example.user.ormlite;

import android.content.Context;
import android.database.sqlite.SQLiteDatabase;
import com.j256.ormlite.android.apptools.OrmLiteSqliteOpenHelper;
import com.j256.ormlite.dao.Dao;
import com.j256.ormlite.dao.RuntimeExceptionDao;
import com.j256.ormlite.support.ConnectionSource;
import com.j256.ormlite.table.TableUtils;

import java.sql.SQLException;

/**
 * Created by Eugene Alvizo on 1/4/2015.
 */
public class DataHelper extends OrmLiteSqliteOpenHelper {

    private Context context;
    private static final String DATABASE_NAME = "Student";
    private static final int DATABASE_VERSION = 1;


    private RuntimeExceptionDao<student integer=""> studRuntimeDAO = null;
    public DataHelper(Context context) {
        super(context, DATABASE_NAME, null, DATABASE_VERSION);
        this.context = context;
    }

    @Override
    public void onCreate(SQLiteDatabase sqLiteDatabase, ConnectionSource connectionSource) {
        try {
            TableUtils.createTable(connectionSource, Student.class);
        } catch (SQLException e){
            e.printStackTrace();
        }

    }

    @Override
    public void onUpgrade(SQLiteDatabase sqLiteDatabase, ConnectionSource connectionSource, int i, int i2) {
        try {
            TableUtils.dropTable(connectionSource, Student.class, true);
            onCreate(sqLiteDatabase,connectionSource);
        } catch (SQLException e) {
            e.printStackTrace();
        }

    }

    public RuntimeExceptionDao<student integer=""> getStudRuntimeExceptionDao(){
        if(studRuntimeDAO == null){
            studRuntimeDAO = getRuntimeExceptionDao(Student.class);
        }
        return studRuntimeDAO;

    }

}
<LinearLayout xmlns:android="http://schemas.android.com/apk/res/android"
    xmlns:tools="http://schemas.android.com/tools" android:layout_width="match_parent"
    android:layout_height="match_parent" android:paddingLeft="@dimen/activity_horizontal_margin"
    android:paddingRight="@dimen/activity_horizontal_margin"
    android:paddingTop="@dimen/activity_vertical_margin"
    android:paddingBottom="@dimen/activity_vertical_margin" tools:context=".MainActivity"
    android:orientation="vertical">

    <LinearLayout
        android:layout_width="match_parent"
        android:layout_height="match_parent"
        android:orientation="vertical"
        android:gravity="center">
    <EditText
        android:layout_width="180dp"
        android:layout_height="45dp"
        android:hint="Name"
        android:id="@+id/name"/>
    <EditText
        android:layout_width="180dp"
        android:layout_height="45dp"
        android:hint="Lastname"
        android:id="@+id/surname"/>
    <EditText
        android:layout_width="180dp"
        android:layout_height="45dp"
        android:hint="Age"
        android:inputType="number"
        android:id="@+id/age"/>
    <Button
        android:layout_width="180dp"
        android:layout_height="45dp"
        android:text="Save"
        android:id="@+id/btn_save"/>
    <Button
        android:layout_width="180dp"
        android:layout_height="45dp"
        android:text="View All"
        android:id="@+id/btn_view"/>
        <Button
            android:layout_width="180dp"
            android:layout_height="45dp"
            android:text="Delete All"
            android:id="@+id/btn_delete"/>
    </LinearLayout>

</LinearLayout>


